Recovery modes
Quick vs deep scan in practice
When each mode wins, how to interpret “state” in the list, and why a slow deep scan is sometimes the only honest option.
Continue readingWindows recovery Operator playbook
Recuva targets local disks and removable media. We turn it into a disciplined workflow: the right scan mode, zero new writes on the source, ruthless triage of results, and fixes for the failure modes that burn hours when the clock is loud.
Whether you are on NTFS, exFAT, or FAT32, the same rules apply: stabilize the volume, pick staging space on another physical disk, then prove files in real apps before you call the job done.
Why operators bookmark this
The wizard UI is calm; the physics are not. Scope, media path, disk hygiene, and how you escalate determine whether you ship a clean handoff - or a folder of false hope.
Narrow to folders and types first - full-volume sweeps are the tax you pay when metadata is truly gone.
USB and SD work when the bus is honest - reader quality and stable letters beat another software toggle.
When the job is “make it unrecoverable,” optional secure delete closes the loop after exports are verified.
Support mirrors what breaks in the field - structured enough to paste into a ticket without losing nuance.
Who this is for
Whether you are rescuing your own thesis or documenting steps for a ticket, the sequence stays the same - only the paperwork and stakes change.
Photos, schoolwork, and “I emptied the Recycle Bin by reflex.” You need plain language, a checklist, and permission to go slow so you do not toast the disk.
Start: First response · Fundamentals · Pitfalls
Repeatable language for users, plus triage when USB enumeration flakes or deep scan “never finishes.” Copy-paste structure from Support into tickets without sounding robotic.
SD cards after a shoot, external SSDs on location, and tight deadlines. You care about verified previews, not green checkmarks on mystery files.
Start: SD & USB · Outcomes · After export
First response
Panic installs new files, updates indexes, and sometimes accepts a format prompt you will regret. Pause, treat the source volume as read-only in spirit, and line up evidence before you change the machine’s state.
Stop writing to the source
Close apps that sync or download to that disk. Do not defragment, “clean up,” or save screenshots onto the volume you hope to recover from.
Snapshot context
Note approximate time of delete, whether the Recycle Bin was emptied, and if the card or USB was reformatted. That story picks quick vs deep scan and sets expectations.
Confirm mount and letter
Disk Management should show the volume online with a stable letter. If it flaps or asks to format, fix cable, reader, or enclosure before you blame Recuva.
Reserve staging disk space
Identify a different physical drive with enough free space for exports. If you only have one disk, borrow external storage before you run the wizard.
If the drive makes new noises or disappears from the BIOS list, skip software loops and read Support → escalation guidance.
After the incident
Recuva is a last-line tool: it hunts for data the filesystem still knows about - or patterns buried in sectors. Versioned backups, sync with history, and offline archives are the first-line defense. The best outcome is never needing a deep scan.
If you recover successfully, schedule a boring backup before you close the ticket. If recovery fails, backups (or a lab) are the honest next chapter - not another sketchy “100% recovery” ad.
The wizard only reads storage Windows exposes as a volume. Encryption, cloud-only copies, and mechanical failure sit outside what a local undelete pass can fix.
Often in scope
Usually not a Recuva-only fix
Deeper scenario language lives on Outcomes; drive symptoms on Support.
Scan strategy
The same disk can answer differently depending on how Recuva asks the question. Quick scan is cheap and fast when the filesystem still remembers your files; deep scan is the heavy lift when metadata is gone, corrupted, or the volume was reformatted.
| Dimension | Quick scan | Deep scan |
|---|---|---|
| What it reads | Filesystem structures: directories, MFT-style records, typical delete traces. | Sectors end-to-end, file signatures, carved data with weaker path context. |
| Typical duration | Seconds to a few minutes on healthy volumes. | Minutes to many hours - scales with capacity and interface speed. |
| Best when | Recent deletes, known folder, Recycle Bin scenarios, light reuse. | Quick results empty, reformatted card, corrupted FS, or long elapsed time. |
| Trade-off | May miss data if metadata no longer points to clusters. | More false positives; filenames and paths may be generic or missing. |
Tip
Run quick scan first, export a manifest of paths, then escalate - deep scan results are easier to read when you know what “missing” looked like.
SSD note
Background TRIM and encryption change how long deleted data lingers - pair expectations with our SSD & TRIM article.
SD & USB
If the OS flips between “mount” and “format me,” fix the reader and cable before you blame scan depth - see removable media guide.
Screens, filters, and advanced mode: Features tour · Long-form walkthrough: Quick vs deep in practice
Operator fundamentals
Recuva’s wizard hides complexity, but recovery is still a sequence of decisions. The guides on this site walk the same path a careful operator takes: reduce write risk, pick a scan mode that matches how the data disappeared, then prove candidates before you celebrate.
Confirm the disk or card mounts cleanly, use a known-good cable or reader, and avoid installing tools onto the volume you are trying to save.
Start narrow (folder or file type) when metadata still exists. Escalate to deep scan when quick results are empty or obviously incomplete.
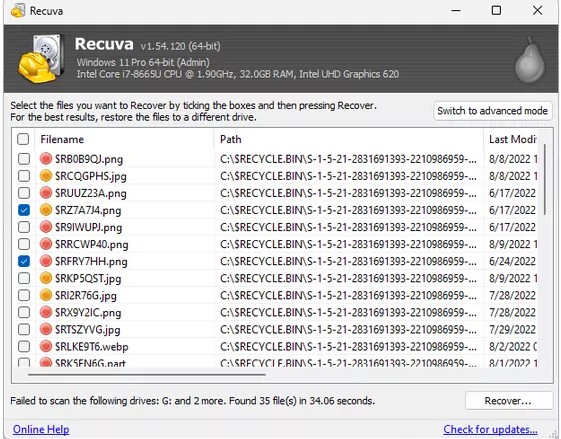
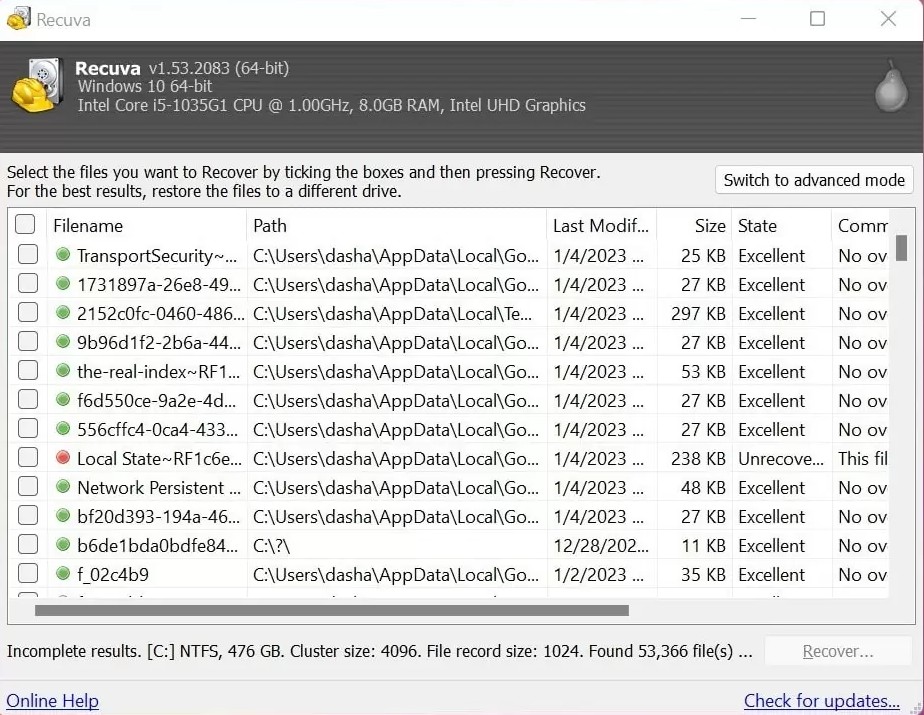
Sort by path, size, and state. Open samples in real apps - icons and extensions lie after aggressive carving.
Stage exports on a different physical disk with verified free space, then hash or spot-check before you hand off.
See the full workflow playbook for phase-by-phase detail and GIF references.
recuva.pro is an independent educational guide: scan strategy, UI tour, troubleshooting patterns, and realistic outcomes. We do not distribute Recuva binaries or guarantee recovery of any specific file.
Always obtain Recuva from a source you trust, verify signatures or hashes when your policy requires it, and treat any recovery result as provisional until you have opened and validated the data that matters.
Same tool, different stakes - the playbook shifts slightly for each situation.
Accidental deletes from Desktop, Documents, or camera SD cards - often recoverable if the card was not heavily reused.
Read expectationsLetter changes, unsafe eject, or “need to format” prompts - bus and enclosure quality often matter more than another scan pass.
Troubleshoot drivesTRIM, encryption, and OS background activity shrink the window on internal SSDs - deep scan still helps, but expectations differ from classic spinning disks.
SSD & scan articlesAfter the export
A high hit count in the results grid only matters if the files you care about open cleanly in their real applications. The steps below mirror what careful operators do before they delete anything from the source disk or tell a stakeholder “we are good.”
Recover a handful of representative files first—documents, images, archives—and open them on the staging disk. If previews or headers are wrong, adjust filters or rescan before you commit hours to a giant export.
Legal and creative workflows often need original paths. When the wizard allows, restore into a dated folder tree on staging so reviewers can diff against backups or version control without guessing which carve belongs where.
Pointing exports at Desktop or Documents can trigger OneDrive, Dropbox, or Google Drive to upload partial or corrupted files and churn the disk. Prefer a dedicated folder on a non-synced volume until verification is done.
Real-time scanners may lock files during copy. If exports fail or truncate, pause scanning on the staging path temporarily, retry, and document the exception for security review.
Drive quirks: Support & troubleshooting
After you have secured what you need, secure delete can help on spinning media where overwriting still matters. SSDs and TRIM complicate that story—pair tool features with realistic expectations.
Future you (or IT) will want: source disk ID, quick vs deep, Recuva build, export path, and which files were validated. That single paragraph prevents duplicate destructive scans.
For audits or legal holds, record checksums of recovered artifacts once they are stable. Our verify exports article walks through why “copy finished” is not the same as “copy integrity proved.”
State columns are hints, not promises. Combine them with staging discipline and spot-opens—see result states and the outcomes page for composite scenarios.
Language
Short definitions so forum posts, tooltips, and our guides mean the same thing when you are under pressure.
Know when to hand off
Recuva belongs in the toolbox, not in every crisis. Some signals mean power-cycling and repeated scans will only shave platters or cement damage.
Logical deletes, quick formats, accidental empties, and “wrong USB unplugged” scenarios are exactly where disciplined Recuva use shines - especially with a separate staging disk and documented steps.
When symptoms are purely logical, our Support page lists the failure modes we see most often; pair it with motion reference so you are not guessing which button comes next.
Explore
Bookmark or share a single URL. Features, workflow, outcomes, support, blog, and FAQ each live on their own page.
Full arc on one page: hero through Download now.
Screens, scans, and power-user options.
Two-phase recovery playbook and motion reference.
Scenarios and realistic expectations.
Troubleshooting drives, scans, and corrupt files.
Long reads on scan strategy and SSD physics.
Short answers for search and skimmers.
Deep dives
When a checklist is not enough, these articles explain trade-offs, hardware behavior, and how to read confusing results without drowning in jargon.
Recovery modes
When each mode wins, how to interpret “state” in the list, and why a slow deep scan is sometimes the only honest option.
Continue readingRemovable media
Readers that flake, unsafe eject folklore, and why “format” prompts should trigger a hardware check - not an endless rescan loop.
Continue readingStorage physics
Why internal SSDs behave differently from thumb drives, and how encryption plus OS housekeeping change what “deleted” really means.
Continue readingDisk hygiene
Why the destination must be another physical drive, how to sanity-check free space, and what goes wrong when exports land on the same volume you are scanning.
Continue readingResults grid
How to read state labels without fooling yourself, and when to stop rescanning and change hardware or expectations instead.
Continue readingIntegrity
Checksums, spot-opens, and manifest habits that turn a pile of recovered files into something auditors and teammates can trust.
Continue readingPower users
Narrowing huge deep-scan results by extension, path fragments, and size so you spend time on plausible candidates first.
Continue readingAlso on the blog: Secure delete and portable runs Restore folder structure
Motion
Two silent screen captures walk prompts, progress bars, and the file list you will triage - useful when you are briefing someone else or rehearsing under calm conditions.
Also on Workflow
Phase 1 and Phase 2 checklists, Android mounting notes, and the same GIFs - so this home page stays readable while the workflow page stays exhaustive.
Full playbookFast lane
Skim these, then follow the links when you need screenshots, edge cases, or longer explanations.
Recovery basics
What is Recuva? A Windows utility that scans storage for deleted files and helps you copy them to another location. It is not a cloud service and does not send your data off-disk by default.
Performance
Why is deep scan slow? It reads far more of the disk surface and reconstructs files from patterns - minutes to hours are normal on large or slow media.
Reality check
Can overwritten files come back? Once clusters are reused and new data committed, consumer tools rarely recover the old content. We explain where the line usually sits in FAQ and Outcomes.
Features
Quick vs deep scan? Quick leans on filesystem metadata; deep ignores it and searches raw sectors. The Features page maps each mode to what you see in the UI.
Encryption
Does Recuva see through BitLocker? No meaningful file listing appears until the volume is unlocked with the right key or recovery password. Unlock on a trusted machine, then scan; see Support for drive-not-listed patterns.
Recycle Bin
After emptying the Recycle Bin? Files can still be recoverable if clusters were not reused. Quick scan first, and check whether Windows Previous versions or File History already has a copy before you commit to a long deep run. More limits in FAQ.
Same-disk recovery
Can I save files onto the drive I am scanning? You should not—new writes can overwrite clusters that still hold recoverable data. Always stage to another physical disk with verified free space; see staging disks and Workflow.
Cloud folders
Is my Desktop safe for exports? If OneDrive or another sync client watches that path, exports can upload before you verify integrity—or trigger extra writes. Prefer a dedicated folder on a non-synced volume until checks pass; see After the export.
Other platforms
Mac or Linux? Recuva is Windows-native. Attach the disk to a Windows PC or VM with reliable passthrough, avoid reformatting just to get a mount, then scan—summarized in FAQ.
Secure overwrite for sensitive deletes, optional folder-structure restore in advanced flows, and portable use when policy forbids installers - these options change outcomes as much as scan mode.
Pitfalls
None of these are moral failures - they are the defaults panic installs. Catch them early and the rest of the playbook gets easier.
Before the installer
You will see the same themes in the Download now section below - this strip is the narrative version for people who think in sequences.
Identify the source disk
Letter, model, and capacity - screenshot Disk Management if you are coordinating remotely.
Reserve staging space
A different physical disk with headroom - not the partition you are scanning.
Vet the binary
Code signature, internal mirror policy, optional SHA-256 compare - details in the download section.
Quiet background writers
Pause heavy sync, torrents, and installers that might target the wrong volume mid-run.
Plan the narrative
Folder names with dates, scan mode, and build number - future you (or audit) will need the story.
Run the wizard calmly
Rehearse with motion reference first if someone else is watching the screen.
Editorial note
Pages here are written for clarity under stress: we favor repeatable steps over hype, link out when a topic deserves its own screen, and revise when Windows or Recuva’s UI shifts. If something reads outdated, compare against a current Recuva reference you trust and your org’s change log.

Recuva is a Windows desktop utility. Before execution, align on a trusted binary, optional hash verification, and a recovery target that is not the source volume.
recuva.pro does not host installers - we teach the discipline once you hold a vetted build.
Windows · Often free tier · Execute only after verification
Enterprise hygiene
If you mirror the installer internally, publish SHA-256 hashes - filenames lie; digests do not.
Golden rule
Never recover onto the volume under scan. Stage a separate disk with headroom you have verified.
Expandables
Tap to expand - same Q&A set as our FAQ page, in the same order.
Recuva restores accidentally deleted files from internal drives, external disks, USB sticks, and SD cards on Windows. Quick scan checks the file system; deep scan searches the disk for signatures when metadata is gone or unreliable.
Deep scan reads raw clusters to match file patterns. Bigger disks, slow interfaces, and fragmentation all add time. Let it complete and always recover to a different drive than the one you are scanning.
Usually no - once new data occupies the same sectors, previous content is effectively gone. Power down unnecessary writes immediately; if possible, image the disk from another machine.
Recuva.pro is an independent educational site. It is not the developer of Recuva. Prefer installers from sources you trust, verify digital signatures when possible, and avoid repackaged downloads with extra bundles.
You should not. Writing recovered files onto the volume under scan can overwrite clusters that still hold recoverable data. Use a different physical disk with enough free space, then verify opens before deleting anything from the source.
More: staging disks on the blog.
Quick scan reads the file system metadata for deleted entries - it is fast when the table is healthy. Deep scan walks raw sectors looking for known file signatures - slower, for corruption, quick format, or when quick scan returns nothing useful.
More: quick vs deep on the blog.
Recuva is built for Windows. If files lived on a Mac-formatted disk, attach it to a Windows machine or a VM with reliable disk passthrough before recovery, and do not format the disk just to make it mount.
Normal Recuva use works on local volumes and does not upload your data as part of scanning. You choose where exports are saved; avoid staging into cloud-synced folders if policy requires the export to stay local until reviewed.
No. BitLocker volumes need valid keys or recovery material before the filesystem is readable. Ransomware is a cryptography problem - Recuva does not decrypt locked payloads.
Use a channel you already trust or an IT-approved mirror, verify digital signatures or hashes when your policy requires, and avoid repackagers that bundle adware.
See also: Download now section on the home page.
Do not format if you still need the data. Use a stable card reader and a desktop USB port, then scan. Formatting can destroy metadata you need for recovery.
More: SD card recovery on the blog.
No. Clicking, power-off, or SMART failure needs hardware help or a clean-room lab. Stop repeated power cycles and avoid tools that stress a dying disk. Software assumes the media can be read reliably.